Showing posts with label Information. Show all posts

(SOLVE) The local policy of this system does not permit you to logon interactively

(SOLVE) The local policy of this system does not permit you to logon interactively

Posted in ,
No comments
By Unknown


This error indicates that the group policy of the terminal server does not allow you to logon interactively. The settings will have to be changed from the group policy object editor by your administrator.
To do this, open gpedit.msc and navigate to the following section:
Local Computer Policy > Computer Configuration > Windows Settings > Security Settings > Local Policies > User Rights Assignment
and after double clicking on the “Allow Log on Locally” from the Policy list, choose the user that you want to grant local log on access to and press OK. The image below indicates which section must be clicked on.
You do not have access to logon to this session.
The error message below means that you do not have access to logon to the terminal services session because your account has not been given the effective permissions from the terminal services manager on the server.
To correct this, open the Terminal Services Configuration, double click the RDP option in the main window and go to the permissions tab. Select Add and choose your account before pressing OK and assigning the right permissions to that account. Now attempt to logon again with that user account.

Terminal Services Client Logon - A step-by-step guide

Any To Icon

Any To Icon

No comments
By Unknown


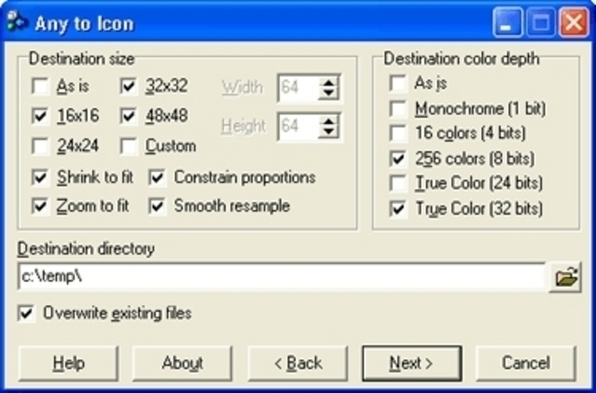
Another software Any To Icon is a software that can extract icons from libraries like {exe,dll,bin,etc}
can make icons from Photoshop archives, pdd files,  png images, other photo formates .Any to Icon converts BMP, JPEG, GIF, PNG, PSD, WMF, WBMP, XPM, TIFF and CUR formats into Windows icons. You can add files and folders from Windows Explorer or other file shells using drag and drop, and you can break down entire icon libraries into individual icons. You can change color resolution and size to create customized icons. Any to Icon allows you to extract icons from folders and libraries. It's easy to process multiple files at once..It is shareware & key is also in the file.

You can download it from  this link                                Download

I-Care Data Recovery ENTERPRISE v 4.3 Registred

I-Care Data Recovery ENTERPRISE v 4.3 Registred

No comments
By Unknown


Focused on file recovery, iCare Data Recovery Software makes the most possiblility of your data rescue. Here are some of the symptom that presents your need of this program to fix errors and bring data back.


  • Reformatted partition, memory card, external drive, USB drive, sd card...
  • Repartitioned hard disk drive and need file recovery
  • Ghost failure, copy failure, formatted disk
  • Quick formatted disk, complete format, full format recovery
  • Resize partition, merge partition, copy partition failure by PartitionMagic, Partition Manager...
  • File system RAW, RAW drive, chkdsk reports not available for RAW drive...
  • Pressed restore button of iPhone, Blackberry, iPod and want to restore music files
  • Reformatted sd card, xd card, cf card, pen stick, memory card...
  • System cannot boot, cannot locate the boot partition, I/O error
  • external drive, memory card, cf card cannot be detected or recognized...
  • Virus attack and lost files
  • Bad boot sector, bad partition table, damaged FAT, lost File Allocation Table...
  • Recover files from FAT, NTFS partitions
  • Recover files from devices with unknown file systems including Hard Disk, external ZIP/USB drive, removable  SmartMedia, MemoryStick, SD cards, etc.
  • Partition structures are damaged or deleted...
Download Link

Create Wedding Album with Wedding Album Maker Gold Latest Version with Serial Key

Create Wedding Album with Wedding Album Maker Gold Latest Version with Serial Key

No comments
By Unknown

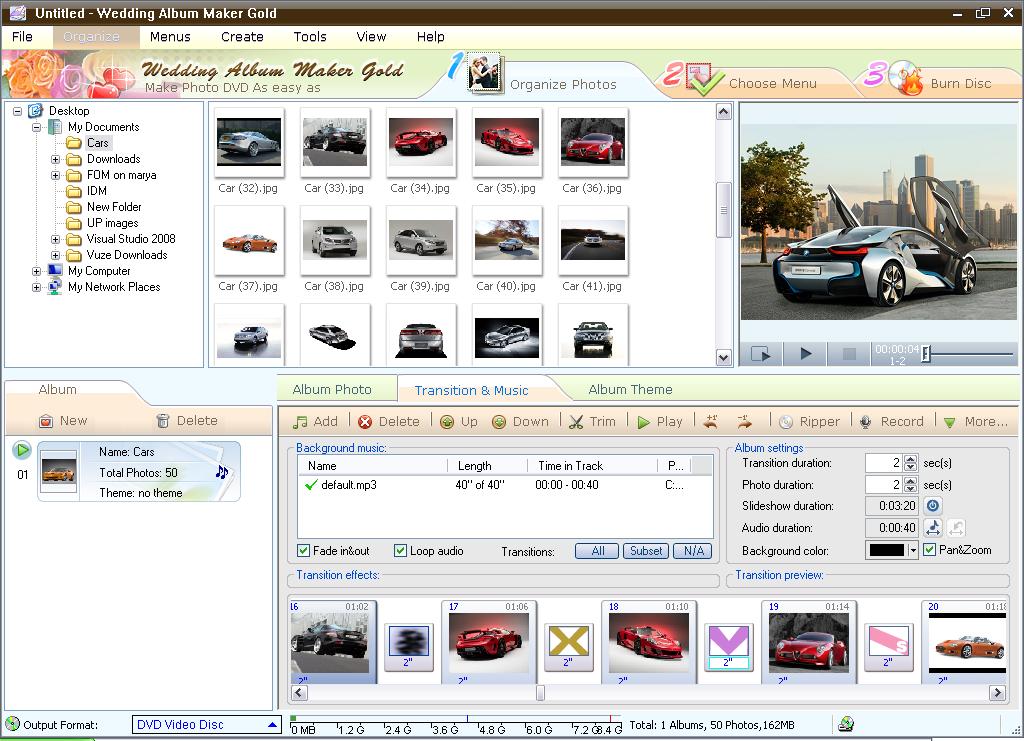
 Wedding Album Maker Gold is an intuitive way to create custom slideshows and save them in a variety of formats. Although it's not the most sophisticated program we've ever seen, it's easy to use, and is a good choice for users that aren't too picky.

The program's interface is very intuitive, allowing us to create our first album in a matter of minutes. The program walks users through the process of selecting photos, adjusting transition effects, adding music, selecting a template and menu, and selecting the proper output format. The interface isn't particularly slick-looking, but it's extremely easy to navigate. The program contained the typical features that one would expect from a slideshow maker, and we especially liked the wide variety of output formats. Users can save their slideshows to DVDs, but also create Flash movies, MPGs, Web albums, and movies ready for upload to YouTube or MySpace. If the program has any weakness as far as its features are concerned, it's with the templates that are included. These trend more toward cute than sophisticated, and some of them are downright cheesy. Users do have the option of not using one at all and displaying their images unadorned, which is a relief. The program's built-in Help file is well-written and thorough.

Registration info

Name   : Qantum
Serial    : 000J2K-4ZJ8AW-DJ95BJ-DKQC93-JFXEQ2-315ZFZ-E8TB07
Dowbload Link (Official)

Resize Your Image with "Light Image Reizer" Serial Included

Resize Your Image with "Light Image Reizer" Serial Included

No comments
By Unknown

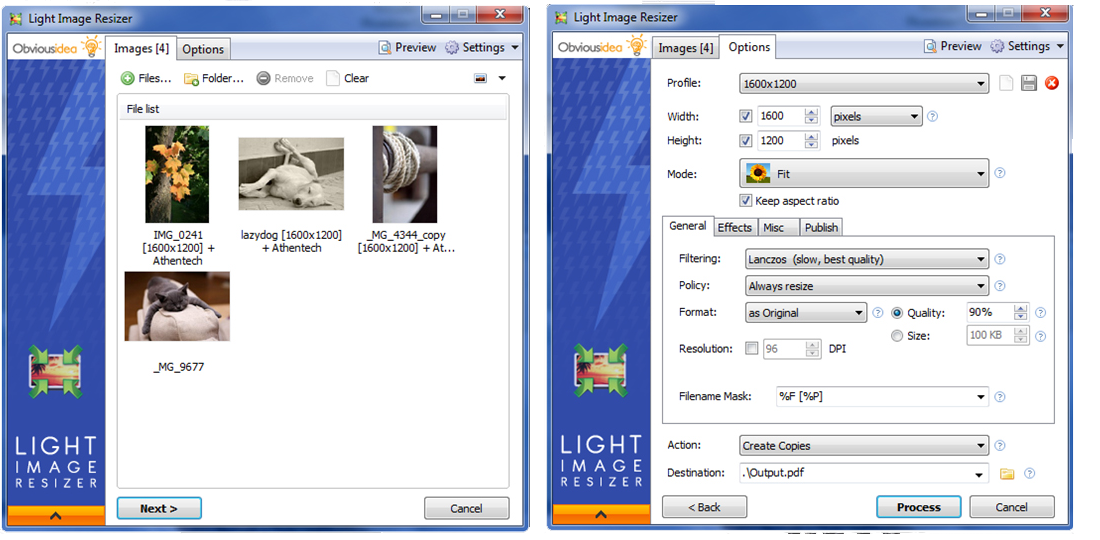
Light Image Resizer software organizes your photos by changing their resolution or moving them within your hard drive. VSO Image Resizer is the tool for those who store their digital pictures and images on their PC and who want to resize, compress, convert, create copies, create thumbnails, and import or organize photos. you can easily create copies or you can work on the original HQ photos. Then share your resized photos online with friends.

Featurs:


  • Resize pictures, resize photos, resize images – compress, convert, and create copies of your pictures
  • A batch image resizer
  • High quality results with fast multi-core, picture resize technology
  • Top quality image resize filters – linear for speed, cubic and lanczos for quality
  • Create and e-mail friendly images or use them for web publishing
  • Rename, sort or add a watermark to protect your pictures.
  • Protect all your photos by adding a watermark ( logo or text )
  • Use the profiles library – ipad, iphone, forum, HQ
  • New – create custom pdf pages !

Download From Official Site
Serial Key: PYLAC-APWZ8-5SVHN-3VXFY-8BKQ9-3

Audio Editor Gold Xmas Edition 7 with serial

Audio Editor Gold Xmas Edition 7 with serial

No comments
By Unknown

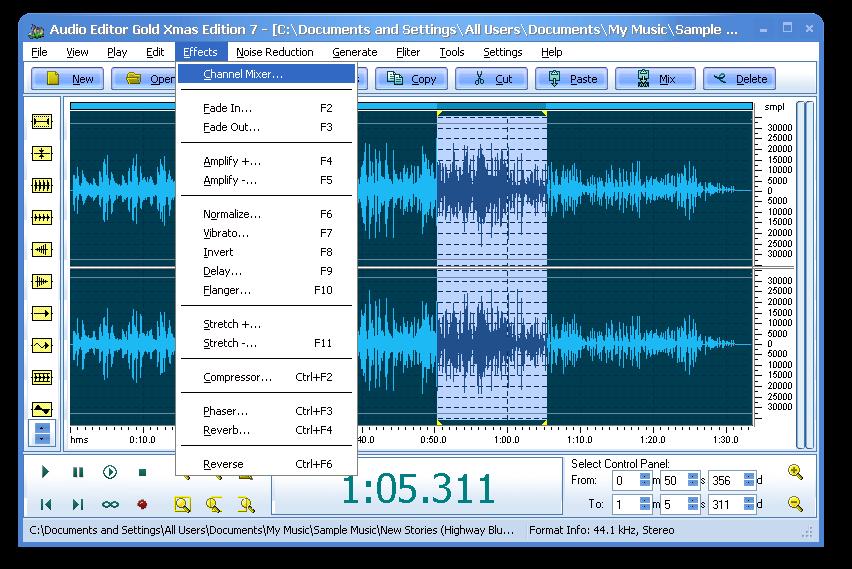
Audio Editor Gold is an advanced and powerful, full-featured digital audio editing software. You can use it to record your own music, voice, or other audio, edit it, mix it with other audio or musical parts, add effects like Reverb, Chorus, and Echo, and master it so that you can burn it to a CD, post it on the World Wide Web, or e-mail it.
It provides an intuitive, easy-to-use interface and enables you to perform a lot of operations without any difficulties! Audio Editor Gold supports all major audio file formats. If you're using audio for anything - Websites, PowerPoint presentations, Flash animations, It will take your creations to the next level!

Use Audio Editor Gold to record your own music, voice or other sounds, import and export lots of audio files formats, including Windows PCM (WAV), MP3, Ogg Vorbis, WMA 9 and AIFF, play it, mix it, edit audio files visually using Cut, Copy, Paste and applying more than 20 effects and filters, including: Cut, Paste, Move, Delete, Fadein/Out, Crossfade, Vibrato, Delay, Normalize, Fade, Flanger, Amplify, Invert, Insert Silence, and more.

Features:

  • - Convert text to speech; 
  • - A smart recorder included in 7.5 Edition so that you don't need to run the whole application when you just want to record; 
  • -Open, create, and save audio files in any of the supported formats (can also save any portion of a loaded file to disk as a new file); 
  • -Display audio data waveform (Zoom Full, Zoom In, Zoom Out, Zoom Vertical); 
  • -Record audio data from a microphone or any other available input device (You can record audio from DVD / VCD / CD Player, Tapes and LP's, MP3 Player, RealPlayer, Windows Media Player, Web Page, Internet Conversation, Internet News, Internet Radio Station and more); 
  • -Edit audio files visually (Cut, Copy, Delete Selection, Delete Silence, Paste, Paste From File, Mix, Mix From File); 
  • -Apply various effects (Amplify, Compressor, Delay, Equalize, Fade In and Fade Out, Flanger, Invert, Normalize, Phaser, Reverb, Reverse, Silence, Shrink, Stretch, Vibrato, etc.); 
  • -Apply different filters to any selected portion of audio files (BandPass Filter, FFT Filter, HighPass Filter, HighShelf Filter,LowPass Filter, LowShelf Filter, Notch Filter); 
  • -Convert an audio file from one format to another; 
  • -Use marker to locate the selected part or special part of the audio data; 
  • -Add and edit extra information to your audio files (Album, Artist, Comments, Copyright, Genre, Title, Year).

    Download Link

Power Archiver Latest Version With Serial Keys

Power Archiver Latest Version With Serial Keys

No comments
By Unknown

PowerArchiver is a powerful archive utility that supports all common compression formats (ZIP, RAR, ACE, ARJ, LHA, 7zip etc.) and allows you to open and create compressed archives. It integrates with Windows Explorer, allowing for easy management of compressed file types from the right-click menu. PowerArchiver includes a built-in password manager, optional archive encryption (256 bit AES), built-in 7zip support, automatic backup, batch de/compression and more.
Some Important  Features
  • Complete built-in support (including creating archives and adding files) for ZIP, CAB, LHA (LZH), TAR, TAR.GZ, TAR.BZ2 and BH (BlakHole) files, and built-in support for reading and extracting many other file formats: RAR, ARJ, ARC, ACE, ZOO, GZ and BZIP2 
  • Built-in support for XXE and UUE encoded files
  • Many powerful archive operations (including: renaming files in archive, spanning archives, testing archives, viewing and writing comments, installing archives, and checking archives for viruses)
  • Internal viewer that supports TXT, RTF, BMP, ICO, WMF, EMF, GIF and JPG (JPEG) files
  • Sinkable toolbar
  • Drag and Drop from/to Windows Explorer and the Desktop
  • Two ways of viewing archives (Classic - all files in the same listing; Explorer - browsing through an archive like folders in Windows Explorer)
  • Creating powerful ZIP, RAR, ARJ, LHA and BH self-extracting archives
  • Complete integration with Windows (extracting archives and creating archives directly from Windows Explorer using powerful "Explorer Shell Extensions")
  • Viewing files in all view styles, including "as a Web page"
  • Converting between file formats (for example: changing a ZIP archive to CAB archive, or LHA archive to ZIP archive)
  • Tool for repairing corrupted ZIP archives
  • Tool for extracting multiple archives at once
  • Tool for creating backup scripts and running automated backups
  • Auto Update to automatically download and install new versions of PowerArchiver
  • Batch Zip function to create multiple different archives at once
  • Favorite Folders to quickly locate archives
  • Printing file list to printer, or exporting file list to HTML or TXT files
  • Powerful help in HTML and a tutorial with pictures for beginners
  • Many, many other useful and powerful features

    Power Archiver Latest Version Download From Orignal Site 
User Name: LiveLong
Serial Key :  25KGFD-WA65BT-HNJYUJ-DMCAAZ-7P160A

                     26QJKG-JG2BB0-FYHCQX-SH4X64-HMGAFY

                     26YVCY-U8182N-MLR29C-NBU6W3-LSFJXZ

                     26QPS2-9SFG1J-1FZ79Z-PHN0U9-5SRSJE

Arabian Biryani (The Spiny-tailed Lizard or Dhab in Arabia)

Arabian Biryani (The Spiny-tailed Lizard or Dhab in Arabia)

Posted in ,
No comments
By Unknown

imageThis species is widely distributed across both the UAE and Arabia. It prefers natural desert, interspersed with gravel plains. It needs this harder substrate, in order to dig its large burrows,


image image


For Complete Photos Please Visit Blow Mention Link 

Link 1 Click Here 

Link 2 Click Here

How to Connecting 2 computers to LAN UTP Cable

How to Connecting 2 computers to LAN UTP Cable

No comments
By Unknown

One way is to connect two computers using a network cable or commonly known as UTP cable. Technique connect two computers directly with UTP cable is included in the model of peer to peer or point-to-point.


In order for two computers can communicate with each other, at least there are 3 things we should do, namely:

  1. Make sure both computers have been installed Network Card drivers.
  2. Prepare UTP cable with cable arrangement Cross Over
  3. Set IP Address both computers with different IP address but with the same subnet. For example:
                   A computer IP address: 192.168.0.1 with a subnet mask: 255.255.255.0
                    B computer IP address: 192.168.0.2 with a subnet mask: 255.255.255.0
After Cross Over UTP cable installed, the next step is setting up the IP address manually on each computer, here's how the computer with OS Windows XP:

  1. Click Start - Control Panel, double-click Network Connections.
  2. Right click on the Local Area Connection icon, click Properties
  3. In the Local Area Connection Properties window, highlight Internet Protocol (TCP / IP), then click the Properties button as shown below.
  4. Will open the window of Internet Protocol (TCP / IP) Properties, fill in the IP address as shown above.
  5. Do the same thing on the other computer. Set with different IP addresses.
       To test the communication between two computers has been successful, PING commands between computers through the command prompt, if successful will appear Repply message as shown below.
PING antar komputer

     If the computer can not ping each other, check the following:
  1. Check UTP Cross Over cable connections are correct
  2. Make sure that the LAN adapter is active (enable)
  3. Check the IP Address both computers, whether it is a single subnet
  4. Turn off the Firewall or enable (check) the option File and Printer Sharing in Windows Firewall Exception.
      If both computers are connected to each other then we can share data or resources between computers, such as using the printer sharing or exchanging short messages over the network. For how to share data between computers on the network I will discuss in the next post.

Create Wireless Ad Hoc Network in Windows7 to Share Internet

Create Wireless Ad Hoc Network in Windows7 to Share Internet

No comments
By Unknown

What is an Ad Hoc Network

An Ad Hoc network is essentially a local area network that can be set up very easily and spontaneously in no time whatsoever which makes it possible for computers and devices to communicate directly with each other within a limited range. Microsoft Windows XP laid the way of creating this Ad Hoc network and since then it has become possible to share data and internet connection between other wireless devices. To be successful in this operation of ours we need the host computer to be hardwired and have wireless capabilities.

Creating an Ad Hoc Network :


The first and foremost step in this regard is to go to the search box of the start menu and type “wireless”. Once you have done that you should see a list above and from that select “Manage Wireless Networks”.

A new window opens up. In this window navigate to the “Add” button and click on it.


After that click on the option called “Create an ad hoc network”.


Once finished you should see a window appearing where you will find a message telling you about Ad Hoc network. In this window click on “Next”.


The window that appears next requires you to give a network name, security type and the security key. If you wish to use this Ad Hoc network over and over again then check the “Save Network” option. The security type will depend on what the wireless adapter is capable of. In general cases it is found that if you’re only using it quickly with different types of devices it’s easier to have no security. On the other hand if you are keeping it on for full-time use, you’ll definitely want to use security.


After completing with the above just wait a while for the network to be created.


You should receive a message that the network has been created successfully and is ready to use.


Your next job is to verify the Ad Hoc network by clicking on the wireless icon on the task bar. You should see the name of the network and alongside it a message “Waiting for users”.


Now on the client computer when you click on the wireless connection icon you can see the name of the network and also an option “connect”. Click on the option and connect to the network.


Then on the Host machine you will see that the other computer is connected to your Ad Hoc network.
Your Ad Hoc network has been established and you are capable of transferring and sharing files. But if you want to share your internet connection with other wireless devices then go to the host’s wireless adapter icon and right click on it. Then go to “properties” and subsequently to the  “Sharing” tab and select “Allow other network users to connect through this computer’s Internet connection“.


Clicking the “Settings” option you can select the network services the Client machine can access.


Your job is done. Now you can share documents and the Internet connection between machines and devices.

About the Author

Lorem ipsum dolor sit amet, consectetur adipiscing elit. Pellentesque volutpat volutpat nibh nec posuere. Donec auctor arcut pretium consequat.

Proudly Powered by Blogger.